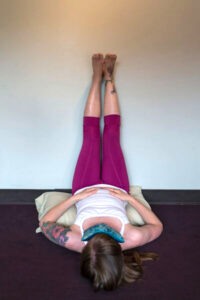
 One of the most essential aspects of my Yoga practice is restorative Yoga which generally consists of holding poses for several minutes and often utilizes props such as bolsters, blankets, and pillows. Although I have several favorite restorative postures, Legs Up the Wall (sometimes referred to as Viparita Karani) is a pose I have used almost daily for well over a decade now. This posture restores the entire body from head to toe, grounds the energy, and calms the mind, making it (in my opinion) the ultimate posture for restoration.
Legs Up the Wall is a safe and simple posture and suitable for individuals of all ages, sizes, and dosha types. It can be practiced in the daytime to combat fatigue (great for work breaks!), or my preferred method, practiced before bed to quiet the mind, release stress, and prepare for sound sleep. Because of its incomparable ability to revitalize the body and mind, it is great for daily practice to support healthy aging and overall physical and mental wellness.
Legs Up the Wall is the restorative variation of Sarvangasana (aka Shoulder Stand), and like its more active counterpart, it removes stagnation and promotes robust circulation throughout the entire body and mind. It is great for reducing swelling in the lower limbs and for general poor circulation of the lower extremities. The increased blood flow to the abdomen promotes healthy digestion and regulates the reproductive organs. Legs Up the Wall can be practiced to improve thyroid functioning, regulate blood pressure, restore the nervous system, and support the immune system.
As a Tridoshic posture, Legs Up the Wall calms Vata and Pitta by activating the parasympathetic nervous system (the “rest and digest” center) and reduces Kapha by removing stagnant energy and stimulating circulation and digestion. This pose makes a great addition to any nighttime routine, and since it will likely put you to sleep, I generally recommend practicing this as the last activity you do before getting into bed. I prefer this “supported” Legs Up the Wall variation (using a pillow under your butt) hands-down over the unsupported, as the pillow aids in comfort and elevates the pelvic region for enhanced benefits.
If you are new to this pose, you are in for a treat! This pose requires no prerequisites, and yes, you can practice it even if you have never done Yoga in your life. So what are you waiting for, grab a pillow and get ready to restore!
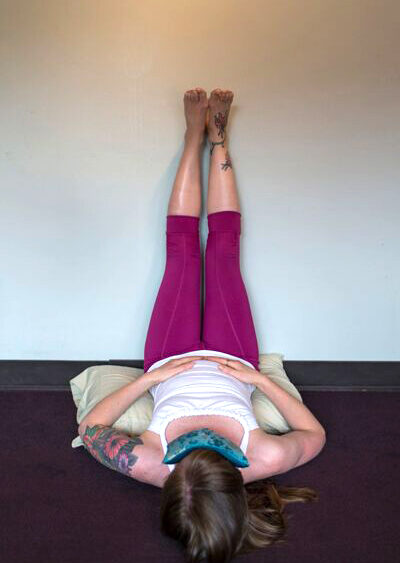
Legs Up the Wall (with support)
- Doshic Qualities: Vata ↓, Pitta ↓, Kapha ↓ (increases Kapha in excess)
- Best Season for Practice: Beneficial in all seasons!
- Elemental Component: Balances Fire; grounds Air and Space; increases Earth and Water
- Main Areas of Healing in the Body: Works on the entire body, especially the lower abdomen, GI tract, lower back, solar plexus, and lower extremities. Heals the mind by reducing stress, promoting relaxation, and supporting emotional balance.
- Main Organs and Systems: Circulatory System; Parasympathetic Nervous System; Respiratory System; Digestive System; Reproductive System; Thyroid; Kidneys
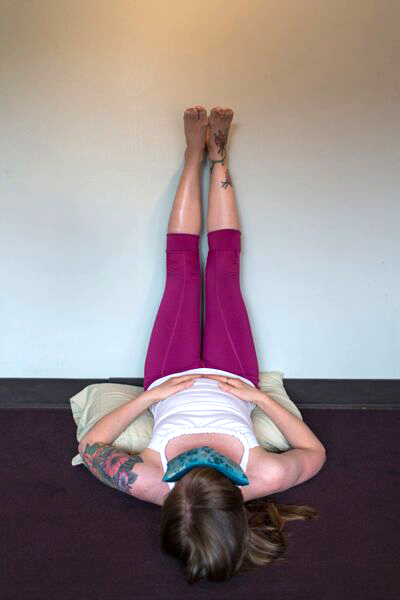
Health Benefits of Legs Up the Wall
- Relieves stress and induces relaxation
- Activates the parasympathetic nervous system (our “rest and digest” center)
- Deactivates the sympathetic nervous system (our”fight or flight” center)
- Removes stagnant energy
- Improves circulation throughout the entire body
- Promotes blood flow to the brain
- Supports healthy mental functioning
- Soothes excessive heat
- Supports healthy digestion; relieves indigestion
- Grounds the energy, calms the mind
- Relieves fatigue
- Supports a healthy reproductive system (avoid during menstruation)
- Prepares the body for sound sleep when practiced before bed
- Balances all doshas and can be practiced daily
Contraindications
- Avoid during menstruation
- Come out of the pose if your feet fall asleep, throb, or tingle
- Avoid with excessively low blood pressure (slightly low is generally safe)
- Avoid with glaucoma (may increase pressure on the eyes)
- Avoid with migraines or severe headaches (may increase pressure)
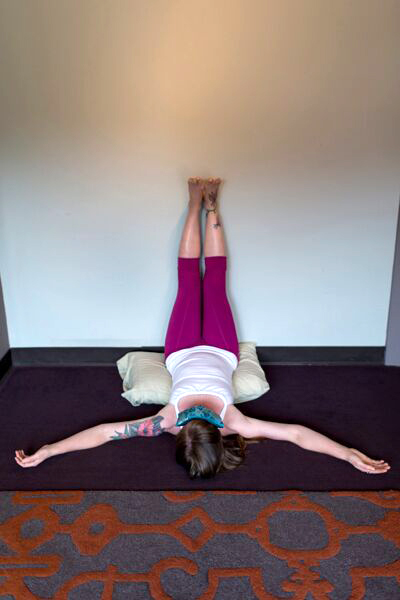
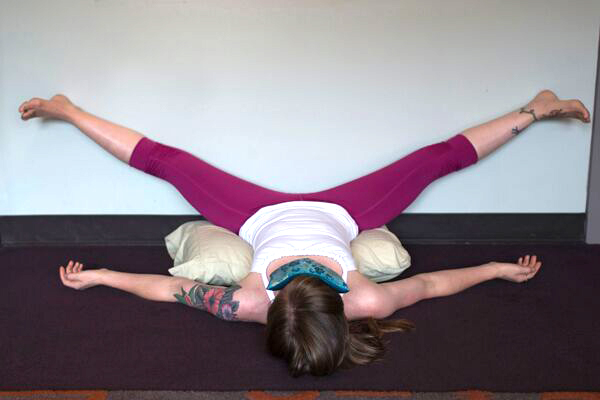

Step-by-Step Instructions
MATERIALS
- Bolster or pillow (I found using a real bolster makes a big difference, but a pillow is a good replacement)
- Blanket to keep warm and comfortable (optional)
- Eye pillow or eye cover (especially if you are practicing before bed)
- Yoga mat or blanket for cushion (if on hardwood floor)
INSTRUCTIONS
*Make sure to have any props (eye cover, blanket, bolster) in arm’s reach so you can use them once in the posture.
1. Place your Yoga mat lengthwise onto the floor where you will be performing this posture (so you are making a “T” with the wall). If you have a carpeted floor, this step is not necessary.
2. Place your pillow or bolster on top of the Yoga mat (if using), placed directly against the wall and parallel to the wall. There should be no space between the pillow and the wall.
3. Begin seated on top of the pillow, directly next to the wall but facing sideways (so your left shoulder is touching the wall).
4. Lean back slowly and carefully (using your hands for support) while straightening your legs and swinging them up the wall.
5. Lay back completely so your butt and lower back are flat on top of the pillow and the top half of your body is comfortably laying down against the ground (or mat).
6. Once you are comfortable, place the eye pillow over your eyes (optional, but recommended for Vata issues and nighttime practices). If needed, I highly suggest a blanket as well to ensure total comfort and relaxation (it is hard to relax if you are cold!).
7. Stay here for a minimum of three to five minutes, or as long as your body needs.
8. Once you are ready to come out, slowly bend your legs and swing them down to the side coming into a “fetal position” on the ground. Stay here for a minute or more. In time, slowly come up to a seated position, take a few deep breaths, and come out of the posture.


Thank you!! Beautifully written and explained and can’t wait to do this particularly since I have multiple sclerosis and traditional yoga poses are not an option right now. I am in Ayurveda health practitioner as well as a retired registered nurse and look forward to reading anything you send me!! Namaste
Prue
Hi Prudence,
I am so happy you found inspiration in the post. I hope you enjoy this restorative pose as much as I do. Feel free to write back if any questions come up.
Many blessings,
Danielle
Can you do this right after food?