 Although fungal nail infections are not often the center of topic, they are highly common, affecting about 14% of individuals worldwide, with an estimated 6 million to 7 million people in the United States alone. If you are one of these individuals, you may feel ashamed or embarrassed about the infection, and likely, you probably know that treating a nail infection naturally is not easy and (quite often) not effective. Well, before you go running to your podiatrist for a prescription, keep reading for a step-by-step regimen that works (tried and true!).
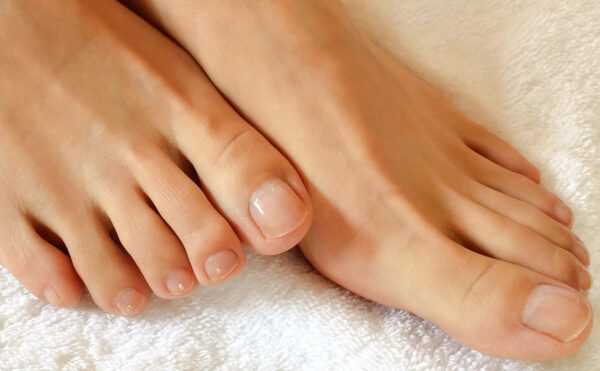
A nail infection, called onychomycosis, occurs when fungus inhabits under a nail and causes yellow, white, or brown discoloration, nail thickening, nail separation, and/or brittle, crumbly nails. It can be called an “opportunistic pathogen” since it commonly invades the toenails, where there is often a warm, dark, moist environment. Further, the fungi not only feed off the keratin protein that makes up a nail, but they are also protected by this hard outer layer. And, this protective keratin layer that the fungi live under is the precise reason why many topical anti-fungal ointments do not work.
Common Causes of Nail Infection
- Wearing tight, unbreathable shoes
- Wearing synthetic material socks
- Chronic nail polish use
- Wet, moist communal areas (e.g. nail parlors, public pools, showers, etc)
- Swimming or walking barefoot in creeks, streams, etc
- Poor foot hygiene
- Trauma or injury to the nail bed
- Being a runner or athlete (due to a sweaty foot environment mixed with the toes hitting the shoe receptively)
- History of Athlete’s foot (tinea pedis)
- Compromised immune system
- Poor circulation to the feet
- History of Psoriasis
- History of Diabetes
- Being of an older age or elderly
- Genetics
With so many factors involved, it is not surprising that nail infection is so common for individuals of all ages. And although it is easy to contract, nail infection can be frustratingly stubborn to treat. But do not fear, it is not impossible, and as you will read below, even chronic infections can be healed naturally with the proper regimen, discipline, and effort.
Depending on the severity of the infection, as well as the strength of the individual, a more invasive treatment may be needed (e.g. medication, laser therapy, etc). However, this nail care program that is listed below should help ease the infection and prevent further progression for everyone!
Before getting into the case study and treatment protocol, I thought I would offer a few words of wisdom. If you are considering a natural treatment for your nail infection, here are some important things to remember:
- For effective results, consistency is 100% essential!
- The more effort you put forth in your treatment plan, the more successful the results will be.
- The length of time needed for healing will vary per case, but is generally 3 to 6 months.
- The treatment protocol should be vigorously followed until the entire infected nail has grown out.
- Spring and summer are often great times of year to administer this treatment, as you can let your feet breathe by avoiding socks and closed-toed shoes as much as possible—this is very helpful for a successful treatment!
- More extreme cases may need more extreme treatments (medication, laser therapy, etc), but trying out a natural path is worth a shot!
Disclaimer: If you have any chronic illnesses, are pregnant, or are on medications, always consult with your doctor before beginning any new herbs or supplements.
Natural Ways to Treat Nail Infection – A Case Study
NOTE: I have obtained permission to retell my client’s story. To keep her story private, her name has been changed.
Intro
My client, Jenny, first came to me in February of 2025 with several minor health concerns. Of these, she was most concerned with treating her toenail infection. She was a healthy 42-year-old, fairly sensitive Vata-Pitta type and did not want to take prescription medications. She ensured that she was willing to put effort into her treatment plan. From her consultation, it seemed like she was well-disciplined and did well with routine, making her a great candidate for the nail care treatment.
Background
Jenny reported that the nail infection came on when she was 28 years old. At that time, she had been extremely sick with a respiratory infection that kept her in bed and at home for almost a month. At this time, she was also vegan, underweight, anemic, and very physically active.
When the infection first came on, it was a fairly minor infection, creating white discoloration and nail separation on a small part of her upper right big toe nail. At this point, it was so small that it did not cause her much worry, and she did not try to treat it, hoping it would eventually go away.
It did not go away, but for many years, it did not get any worse either. Since it was not too noticeable, she continued to ignore it. She would try applying tea tree oil here and there, but since she never saw any improvement, she would always stop after a week or so.
It was not until she was about 40 that the infection started to worsen, creating a yellowish discoloration throughout most of the nail. The right upper corner was still whitish with separation. At this point, she became more focused on trying to treat the infection naturally, using tea tree oil daily, but with no noticeable results. As it steadily got worse over the past two years, she finally decided to seek a more thorough holistic treatment plan.
Relevant Health History
Jenny had previously experienced a toenail infection when she was 19 years old. The infection was on the same toe (her right big toe), as well as on her right “ring” toe. Being young and not knowing about the dangers of prescription medication, she very eagerly took medication to resolve the infection. The medication was successful.
Jenny has a strong family history of fungal nail infections, both on her maternal and paternal sides.
My Examination
When presented, Jenny’s right big toe was mildly yellowish-brown in color. This discoloration affected the entire toenail, except for the upper right quarter, which was a healthy color and free from infection. The upper left quarter was more whitish, with nail separation. The separated section was cut a bit shorter than the rest of the nail.
There were no signs of nail thickening, crumbling, redness, itching, or pain.
Although the infection was undoubtedly chronic (going on 14 years), it was mild to moderate in severity.
Since a fungal nail infection can be caused by a systemic fungal overgrowth (such as Candida), it was important to examine other areas to rule this out. In Jenny’s case, she did not show any other signs of fungal overgrowth, and it was assumed that this was a localized* case of fungal infection.
*This means the fungal infection was only on her toe and not throughout her body.
SIDE NOTE:
Some fungal nail infections stem from systemic fungal overgrowth. Some common signs that a fungal infection could be systemic would be:
- Heavy whitish coating on the tongue
- Foggy mind
- Recurring yeast infections
- Chronic gas, bloating
- Sluggish digestion
- Intense sugar and carb cravings
- Chronic malaise and fatigue
When a fungal infection is systemic, any other affected area should be treated (blood, digestion, skin, etc).
Treatment Protocol
Once we knew we were dealing with a chronic but relatively mild nail infection, it came time to create a protocol that was effective but reasonable for her schedule.
Since Jenny’s nail infection started at the very base of her nail, her treatment lasted about 6 months. This is because the entire nail has to grow out before stopping treatment, otherwise she would risk reinfection. Thankfully, Jenny was very determined. As she began her treatment, she could see improvements fairly early on, which gave her reassurance and motivation to keep going.
Here is her precise routine that she followed (yes, for 6 determined months!):
Complete Nail Routine
Step 1: Clip and file the infected nail.
*This step was only done to begin the treatment and then, as needed, throughout the treatment. This was not a daily task.
Since nail fungus lives under the nail bed, the infected nail should be removed as much as possible—without causing pain. This can be done by first soaking the feet in warm water and then clipping the infected nail(s) as much as possible (without causing pain).
To remove this protective covering further, it was also recommended to file the top of her nail down to allow the Antifungal Foot Soak and Antifungal Nail Oil to penetrate deeper. Once again, it is important to use caution and only file to a point where there is no pain.
Jenny was able to clip a good portion off the top left side of her infected toe due to years of nail separation. The right side was clipped down short, but not quite as short, since this side of the nail was not separated. She had soaked her feet in the Antifungal Foot Soak directly before clipping to help soften the nail.
Jenny used a clean metal nail file* to file the top of her nail down about 30% to 40% without creating pain or discomfort. She immediately reported that she could feel a big difference in the penetration of the foot soak and nail oil, and that the filing helped remove some of the yellowish discoloration.
*This is the nail file that was used and recommended; it is an affiliated link.
Step 2: Soak feet in Antifungal Foot Soak; apply the Antifungal Nail Oil.
After the initial clipping and filing, it was time for Jenny’s daily regimen.
The first instruction was to soak her feet in warm water or Antifungal Foot Soak each morning and evening before applying the Antifungal Nail Oil. This softens the nail to allow better penetration of the oil, treating the infection more deeply. Since fungus lives under the nail bed, this step was very important.
Jenny did not have time in the morning for a full foot soak; however, she generally took a warm bath, or if nothing else, a hot shower. This still allowed her nails to soften, and then after drying them completely, she would apply the Antifungal Nail Oil. This fit into her morning routine well, and she was able to stick to this every day without fail.
For the evenings, Jenny was able to do a full foot soak before bed. She used the Antifungal Foot Soak, but to save money, she only used 2 tablespoons in a small amount of warm water (just enough to cover her feet). Her full nighttime regimen included washing her feet using a tea tree oil soap, soaking them for 10 to 15 minutes, then rinsing and drying them. After this, she would apply the Antifungal Nail Oil and let it soak in for at least 15 minutes before wearing socks (made from 100% wool). In the warmer weather, she would go barefoot to bed.
The evening routine was a bit more timely, but she was able to do this an average of 5 to 6 nights a week. On the nights that she did not do the foot soak, she still applied the Antifungal Nail Oil.
Step 3: Avoid synthetic socks; only wear socks made from natural fibers.
Wearing synthetic fibers for your footwear is an easy way to breed fungal infections, since they often make your feet moist, sweaty, and do not allow them breathe. I have found that only wearing wool or cotton socks (and barefoot when possible) is equally as essential as the foot soak and nail oil for a successful treatment.
Jenny had a couple of pairs of wool socks, but mostly used synthetic fiber socks. After learning this, she realized they did make her feet sweaty and her toes itchy at times. She also mentioned that her nail infection always got worse during the colder months when she had to wear socks all day and night.
Jenny got rid of her synthetic socks and wore only socks made with wool, cotton, and natural fibers. She loved her new sock wardrobe and said they were warm, cozy, and extremely breathable. She reported that she no longer experienced itchy toes after this change. She also noticed that the infected nail was looking notably better and the yellowish discoloration was decreasing.
If you are looking for socks made from breathable fibers, I really like the Darn Tough brand; however, I have found handmade wool socks on Etsy that I enjoy even more! It is a real game changer!!
Step 4: Go barefoot or open-toed as much as possible.
Although wearing breathable socks is essential for successful treatment, wearing no socks and using open-toed shoes whenever possible is even more beneficial!
Luckily, shortly after Jenny began her nail treatment, it was springtime, and she was able to avoid socks and wear sandals for the majority of the day. It also helped that she worked from home, where she could go barefoot as much as possible. Once she was able to do this more often, she noticed the yellowish discoloration disappearing much more dramatically, and she began to see a fresh, healthy, cream-colored nail growing in the entire base of her nail.
Diet
Jenny’s diet was overall fairly healthy, containing mostly home-cooked, unprocessed, and whole foods. To discourage fungal growth, I suggested a few changes to support a “relaxed” anti-Candida type diet.*
*NOTE: It was relaxed since the fungal growth was local and not systemic. If there were signs of systemic fungal overgrowth, a stricter anti-Candida diet would be recommended.
The main suggestions for her diet were to cut out all dairy except for homemade yogurt, eliminate all processed sugars, limit natural sugars to fruit and honey (in moderation), avoid refined grains (including white rice), and eat at least 2 cups of low-starch veggies a day (favoring bitter greens and broccoli).
Read more on an Anti-Candida Diet here!
Herbs
To help support the rest of Jenny’s program, she took a mildly detoxifying, antimicrobial formula throughout the treatment. Since she was a sensitive Vata-Pitta type, I wanted to avoid her taking anything too depleting since she would be taking it for 4 to 6 months.
Here was her formula:
- Guduchi – 5 parts
- Ashwagandha – 4 parts
- Shankapushpi – 4 parts
- Anantamul – 4 parts
- Musta – 3 parts
- Haridra – 2 parts
- Daruharidra – 2 parts
- Neem – 1 part
Since she was busy during the mid-day, Jenny took ¾ teaspoon of this formula in a cup of warm water, twice daily—upon awakening and again before bed. Jenny reported doing well with this formula and was able to take it with about 90% consistency.
For a similar formula, you can use our Daily Detox blend!
Results
After about 30 to 45 days on the nail care regimen, Jenny began to see healthy, fungal-free nail growth on the entire base of her infected toenail. It was hard to notice at first, but as each month went on, the healthy nail grew in more and more. The left side and middle of the nail were growing out faster than the right side.
Despite the infection actively growing out, it was strongly encouraged to continue the treatment protocol just as strictly. Seeing the new nail helped give Jenny motivation to keep it going, and she was able to continue the prescribed nail care for 6 months until the infected nail grew out 100%.
After the infection was eliminated completely, Jenny reduced the Foot Soaks to 1 to 2 times weekly and kept up with the Nail Oil nightly for the first month to prevent reinfection. After this, Jenny discontinued the foot soaks, but continued applying the nail oil before bed each night for about three months (post-infection).
As winter came, she continued to wear only natural fiber socks, and she reported no issues with itchy toes or reinfection. It has now been 6 months since she fully healed her nail infection, and her nails happily remain fungal-free to this day!
Preventative Care
Here are the practices I suggested for Jenny for the first one to three months (post-infection) to prevent reinfection:
- Continue with Antifungal Foot Soak and Antifungal Nail Oil twice daily until the infection was 100% grown out.
- Use the foot soak 1 to 3 times weekly for the first month post-infection; after this, soak as needed.
- Continue to apply Antifungal Nail Oil before bed for three months.
- Continue to wear only natural fiber socks such as wool or cotton; go barefoot or open-toed as much as possible.
- Avoid tight shoes and synthetic fiber socks.
- When exercising, wear clean, breathable socks; replace them with clean, natural fiber socks directly after exercising.
- Avoid nail polish and pedicures.
- Continue the suggested diet; the herbal formula can be discontinued.
Please write in the comments section below to share your experiences or if you have any questions!


GREAT PRODUCTS DO YOU HAVE ANY HERBS TO HEAL TINNITUS?
THANK YOU!
Hi John,
Thank you for writing in! I am glad you enjoy our products. We do have an Ayurvedic Ear Oil that is useful for reducing inflammation in the ear canal and calming the symptoms of tinnitus. It is called Karna Purna Oil, which translates as “Ear Filling” Oil.
You can read more about this product here.
Let me know if you have any further questions!
Many blessings,
Danielle